Installing Liners
Fittings
It is important to consider replacing all yellowed, damaged or questionable wall fittings, skimmers and face plates prior to liner replacement. Also, it will be necessary to install new gaskets for all fittings, skimmers, lights, thermoplastic steps, main drain(s), etc. Make sure to have these on hand before installation begins.
Taping
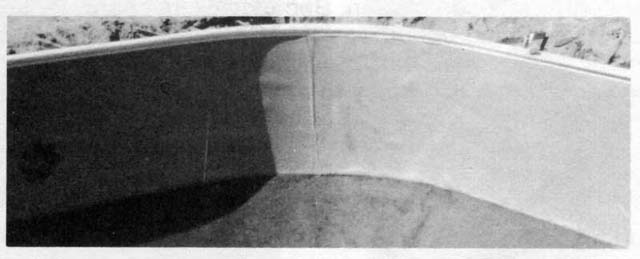
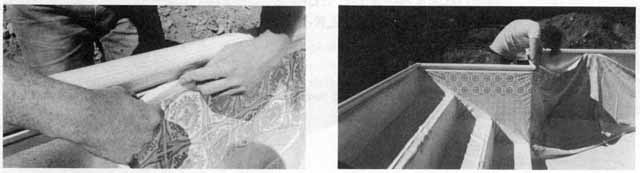
In order to secure an air tight fit when the liner is being set with an industrial vac, all interior seams where the walls are joined together (including steel stair sections) should be taped with duct tape. It is recommended that all interior carriage bolt heads be duct taped as well (refer to picture below).
Installation Of Wall Foam
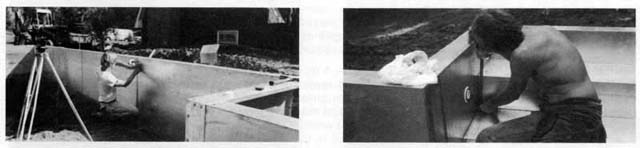
After taping the pool interior seams, wall foam may be applied to the walls and stairs covering roughness and providing a cushion for the liner. (Just as padding provides a luxurious backing for carpeting.) The wall foam comes in a roll 125 feet long, 42 inches wide and 3/16 of an inch thick. It can be adhered to the walls with the use of a spray type adhesive.
Start out by inserting a broom handle in the corner of the rolls. One person will guide the roll by leaning over the top of the wall, while another person inside the pool sprays the wall with the adhesive. Each person can then smooth the foam on the steel panel. Apply the adhesive per panel by spraying top, bottom and both sides of the panel first, then spray an X in the center of the panel.
Apply the wall foam to the steel stairs in the same fashion as one would lay carpeting. Place duct tape on all foam seams.
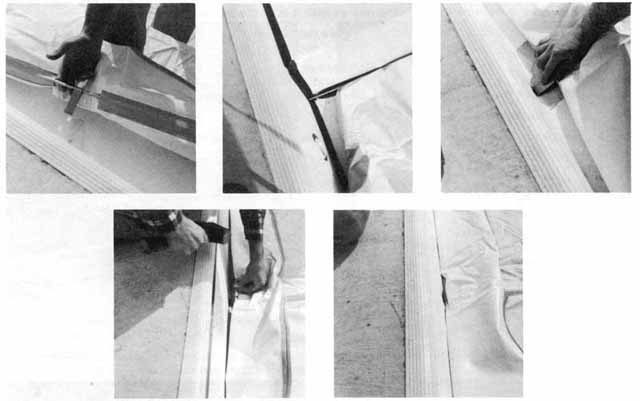
Coping And Extrusion
Cantilever Coping
Some pools feature cantilever coping, where the liner track is integrated directly into the concrete deck instead of a separate coping piece. This style creates a smooth, modern appearance, as the concrete deck extends to the edge of the pool. When replacing or installing a new liner, it’s important to ensure that the bead fits securely into the track beneath the cantilever edge. Because this track is part of the deck itself, you’ll need to check that no concrete debris, sharp edges, or buildup are present in the channel before inserting the liner bead. Proper preparation helps prevent snags or uneven tension in the liner once it’s filled with water.
Concrete Receptor Coping
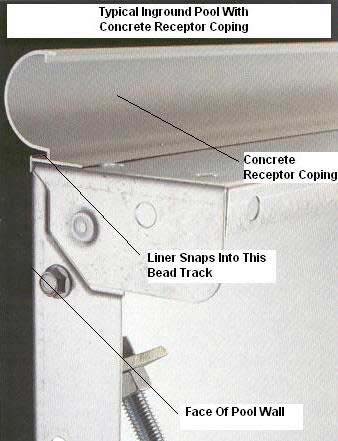
Most pools are built with concrete receptor coping, which includes a dedicated aluminum or PVC coping piece mounted at the top of the pool wall. The liner track is built directly into this coping, providing a clean and consistent fit for the liner bead. During liner replacement, inspect the receptor track for corrosion, chips, or debris that could interfere with seating the liner bead. This type of coping is the most common and installer-friendly option, allowing for easy liner removal and reinstallation over the years without affecting the surrounding deck.
Extrusion
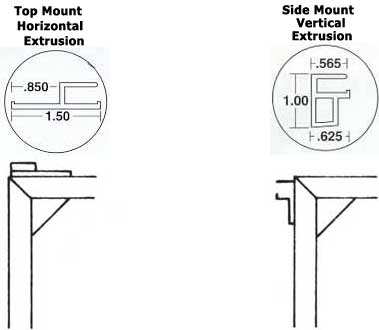
Some older or custom-built pools use overlap liner installations, where the liner extends over the top of the pool wall and is secured with tacks, staples, or a wooden plate. While functional, this style can appear outdated and may make liner changes more difficult. You can modernize the installation by converting to a beaded (or “hung”) system using a plastic extrusion track mounted to either the top or front of the pool wall. This extrusion creates a slot for the liner bead, allowing for easier future replacements, a cleaner appearance, and better long-term durability.
Preparaton of Pool Bottom
Your liner replacement job may only require the installation of a new liner on an existing hard bottom or re-troweling a sand bottom. However, you may find it necessary to start from scratch.
In forming your finished pool base, it is very important to make the right selection of base material conducive to your ground conditions, also to the capabilities of your finishing crew. Below is a list of acceptable maerial used for the pool bottom. Select the one that is best for you.
Mason Or Yellow Sand
This type of sand is fine enough to provide a firm base for the liner. It must be tamped thoroughly, before troweling, to insure firmness. By spray misting water from a hose nozzle, it will compact and make it easier to trowel. Spray misting should be done periodically to keep the sand moist, until the liner is installed. The disadvantages of sand as a pool base is that it will show depressions and indentations from usage. It also is not recommended in areas of high water tables.
Fine Mason Sand And Portland Cement
A mixture of sand and cement provides a hard surface for the pool bottom eliminating the depressions found in bottoms with mason sand only. It is an acceptable base for the liner in unstable ground conditions (clay or high water table). It should be mixed thoroughly in a cement mixer at a ratio of 5 parts of mason sand to 1 part of Portland cement. You have the option of adding water to the sand and cement while it is mixing or applying a fine spray of water from a hose to the dry mixture, after it has been placed in the pool. Periodic spraying of water should be applied to the pool base while troweling to keep it moist until the liner is installed. Note: This mixture can also be ordered from a readymix company in order to eliminate hand mixing.
Concrete
A pool base consisting of a 3,000 lb. mix (small stone, Portland cement and water) will provide a permanent bottom for your pool. There are, however, some factors that should be considered prior to selecting a concrete bottom. First, it is imperative that you have professional masons available to do the troweling. This type of mix sets up rather quickly and must be done correctly the first time. It is necessary to have a finish smooth enough so as not to harm the liner. Once the bottom has been finished, it is recommended that the entire area be checked for smoothness. Any sharp areas must be eliminated and then the whole bottom should be washed thoroughly before installing the liner. Of course, a main drain with a hydrostatic relief valve should be installed as part of this bottom.
Vermiculite
Another type of hard bottom material is referred to as Concrete pool base aggregate. This material provides a non-abrasive surface for the liner while providing a hard surface resisting the formation of pockets or foot prints. Mixed with water and Portland in a paddle type mixer it should be applied according to the manufacturer's application. Because of its characteristics, it is recommended as an acceptable base in unstable ground conditions (clay, high water table). This type of base would be more expensive than the sand and cement mix. CAUTION: When troweling vermiculite, do not try to attain a smooth surface. Too smooth a surface will cause the liner to slide.
Troweling of Pool Base
Start in the hopper end and place the pool base of your choice on the slopes, in preparation to troweling up to the pool walls.
Once the slopes have been troweled, move to the shallow end and trowel shallow end.
Continue troweling the breakover, working to the bottom of the hopper. Finish troweling the bottom of the hopper and exit pool via method shown in picture below.

How To Handle A Water Problem
When water is encountered in the ground during draining of the pool, the following procedure will enable you to divert this water temporarily and keep the area dry during liner replacement. Once the installation is complete, ground water will not disturb the pool because the internal hydrostatic pressure of the pool water is greater than that of the water beneath the pool. It is also advisable to install a hard bottom instead of a sand bottom, thereby eliminating the possibility of a washout of the pool base.
- Dig out hopper bottom one to two feet and place #2 crushed stone (four to six yards, depending on the size of the pool and severity of water problem.)
- If water is erupting from other areas such as the slopes or breakover, dig these areas out and place stone so that the water will drain to the hopper bottom. NOTE: Be sure to dig enough to allow for the addition of two inches of pool base.
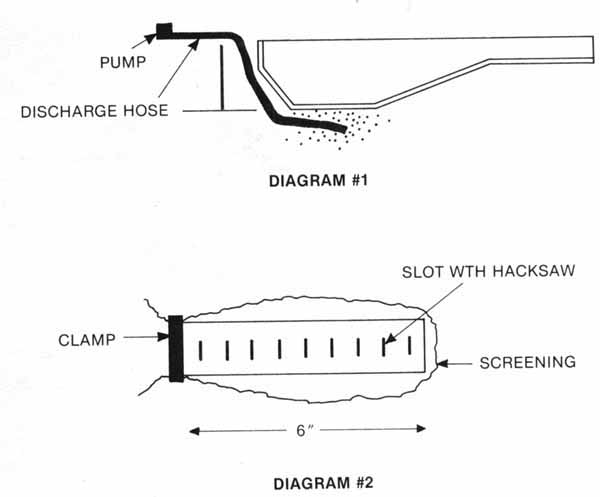
- Next, get enough length of pipe (1 or 1-1/2" diameter) so that you will be able to imbed one end into the stone in the hopper while imbedding and running the rest of the pipe up the slope and under the panels to ground level. (Refer to Diagram #1 below.) NOTE: Be sure the pipe end is located at the bottom of the stone bed.Before inserting the end of the pipe into the stone, either install a foot valve or slot the pipe with a hack saw (approximately six inches of the pipe) and then place screening over the end and clamp. (Refer to Diagram #2.)
- Connect the pipe to a low head electric pump and leave the discharge line slightly elevated so as not to lose prime. Turn it on and leave it running until the pool is finished and is filled with water. Cap off the line and leave it for future use. (The original installer may have done the same, in which case you can connect it to your pump. Turn it on before draining the pool.)
- Cover all stone with either tar paper or vinyl sheeting before the addition of the pool base.
Safety Markers
A Safety stripe is a 12" wide white stripe placed at the top of the slope or break-over. It makes the transition from the shallow end floor to the slope more distinguishable. There is no additional charge for this feature but it must be noted on the order to be added to the liner. Safety stripes cannot be installed on a sloping shallow end liner. Since a safety strips is so visible, they are not advisable on difficult pools or pools that are out of square or uneven. They will only exaggerate any inconsistencies in the pool bottom.
It is also possible to have tread and riser safety markers installed on vinyl covered step sections. This is usually done in a contrasting color to make the steps more distinguishable. There is an additional charge for this application. Consult with the Vinyl Works for the custom pricing for this feature and the details and specifications required.
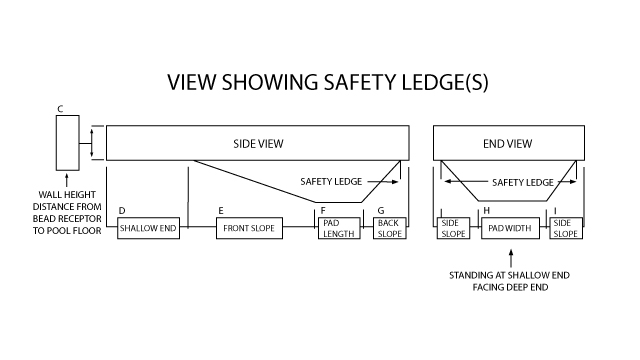
Shallow End Coves
Sometimes in ground pools are built with a shallow end cove to achieve a greater depth in the shallow end. This cove typically tapers into the transition. The cove dimensions must be relayed on the liner order. See the diagrams following for examples. These coves are similar to those used on above ground pool installations. If you are working with a dealer who is building a new pool with a shallow end cove, you should ask where he is locating the step. It is not advisable to cove in front of a step for safety reasons and for best step installation. You should advise the dealer to come out at least 2 feet flat in front of a step unit then taper down to desired shallow end depth.
Liner Installation
iner Installation Be sure to check all coping joints for sharp corners. Cover any existing sharp areas with duct tape so as not to tear the liner during installation.
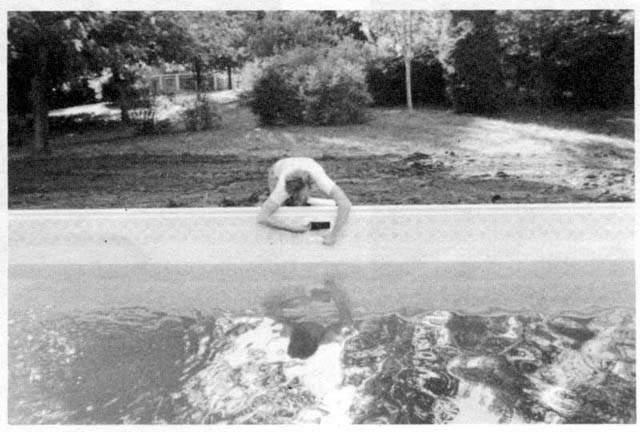
Locate your industrial vacuum at the skimmer and insert the hose into the skimmer throat and out the front down to within 3" of the pool base. Tape around the hose to secure an airtight fit. Unfold the liner at the deep end as per diagram below. Four (4) people are needed for liner installation.
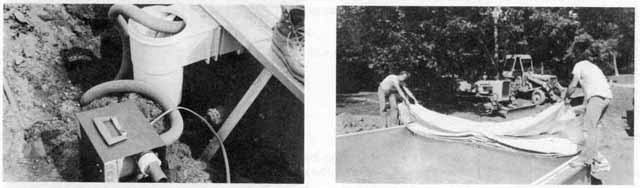
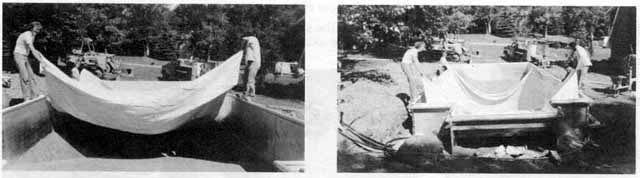
While two people hold the liner on the coping at the deep end, two persons should begin to walk the liner to the shallow end.
As they reach the shallow end, the people holding the liner on the deep end should walk towards the shallow end in order for the liner to be secured in the shallow end first.
Each of the four (4) corners of the liner are marked with a pen on the back of the liner.
Place the liner into the extrusion, making sure the corners in the shallow end are in position.
Continue to place the liner into the extrusion working towards the deep end until the deep end corners are in place.
Be sure the bottom corners in the shallow end of the liner are flush against the wall. The entire shallow end of the liner can be held in position against the wall with the aid of 8' water tubes.
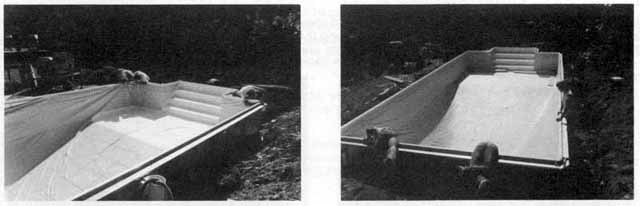
Even off the shallow end of the liner and continue to install the liner along the sides to the hopper corner. Make sure the corners of the liner are aligned with the corners of the hopper end. (There is a pen mark on the back of the liner.)
Final Positioning Of The Liner
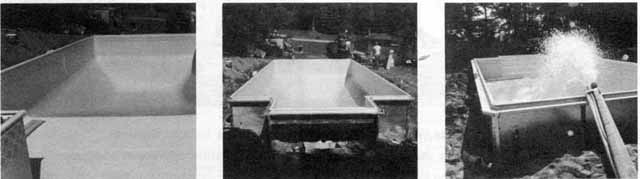
Turn the vacuum on and pull out any liner wrinkles and adjust the liner to match the pool bottom. Wrinkles can be removed by reaching over the wall and pulling on the liner sidewall material.
Once the liner is positioned properly and wrinkles have been removed, fill the pool with water leaving the vacuum running until the water reaches the shallow end.
Turn the vacuum off. Check position of the liner in the shallow end. Adjust if necessary and then continue filling the pool to within the indicator mark on the skimmer.
Installation Of Replacement Liner With Walk-In Stairs
In order to re-install a replacement liner with walk-in-stairs in an existing completed pool, proceed ad follows:
Remove old liner and cut stair liner away from the stair rods. Cut stair rods close to the sides of the stairs and remove the existing rods. Push the remaining rods that are left into the soil. Note: Do not remove bottom stair rod.
Obtain four new stair rods and special mounting clips. Cut the ends of one stair rod so that it will fit the inside of the stairs. This rod will be used for securing the bottom stair liner. Slide this rod into the sleeve in the liner (bottom stair). Continue positioning the other three rods into the sleeves in the liner, along with one special clip per rod. Position the clip so that it is in the center of the stair rod.
Use wire ties to connect the bottom stair rod to the existing rod. The three remaining rods will be secured by the special mounting clips, and by inserting the ends of the rods in the sides of the stairs.
Starting on the third stair an using a rubber hammer, pound the clip into the separation between the stairs. Tap the end of the screwdriver into the separation in order to provide a lead hole for the clip. Caution: Do not make the lead hole too large; otherwise the clip will not fit tight enough.
Place duct tape over the clip once it is in position.
Use water tubes to hold the shallow end against the wall while filling the pool with water.

The following picture sequence shows stairs with wall foam.
Installation Of Face Plates
Refer to the instructions for skimmers, return fittings, light and safety rope. (Do not install the face plates until the water is well over the fitting.)
Place face plates into position, feeling around until all holes line up. With a pointed tool, penetrate the liner where each hole is and affix the face plates with appropriate self tapping screws provided.
After the face plate is secured, cut out the opening with a razor blade.